Tiny House Panel System – Update
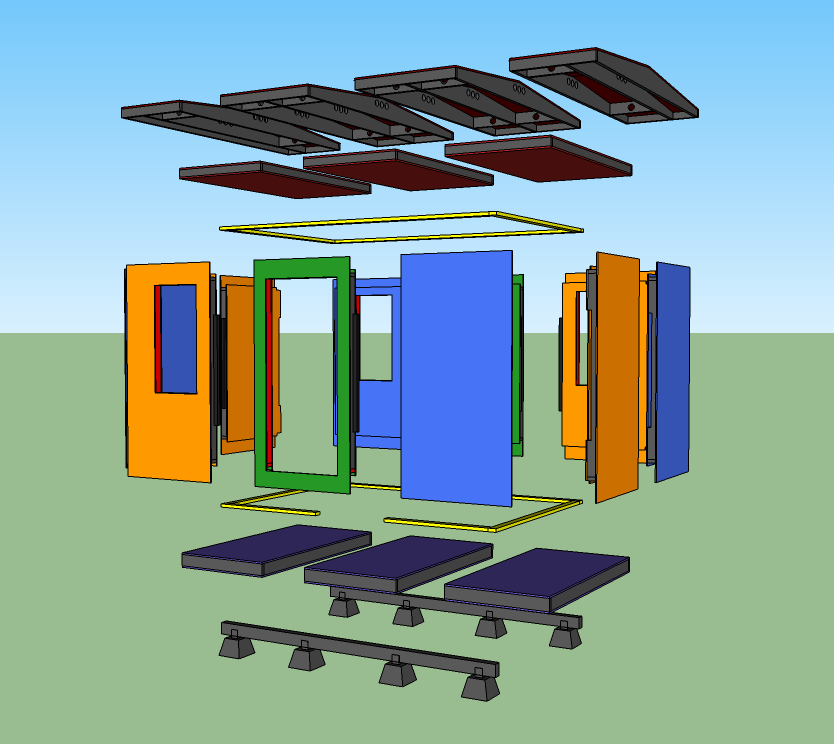
I’m extremely close to publishing the free plans and a detailed ebook for this tiny house panel system. Over the past few weeks it’s evolved into a system of four sandard interlocking wall panels, one floor panel, one ceiling panel and three roof panels. Most of the construction could happen anywhere leaving only assembly work to be done at the building site. The panels are also sized to fit in the bed of a pickup truck.
This design began as an idea to meet a need for sheltering the homeless but with a lot of great input from readers I’ve been able to refine it into a system that could work for any type of small building. Due the standardization of the panels it could also be built by inexperienced builders. I’m working feverishly to finish it up and move onto adapting it for A House for Khayelitsha which will require a few more panels and a slightly different support system.

Above: Different size buildings could be built from the same components. The buildings in the drawing are all 8-feet deep and 8, 12, and 16 feet wide. The roof has a 2/12 pitch.
Below: After considering many different methods of connecting the wall panels this simple solution seemed to be the best. One side of each panel has a pocket that a 2×4 slides into. Then nails or screws could be used to securely connect the panels by driving them through the plywood sheathing and 2×4 stud in the connecting panel. This approach works for corners and strait walls. The panels are colored to show panels of the same type irregardless of the type of window or door opening. Blue and yellow panels are corners. Green panels are strait wall panels. The red studs indicate optional openings in the base panels. Both sides of the panels would be fully sheathed in 1/2″ plywood. The floor panels would have 3/4 plywood sheathing top and bottom.


Above: To add strength and keep the wall panels aligned a 2×4 bottom and top plate would be installed and recessed into a pocket in the panel. In the step-by-step illustrations below you can see how this works a little better.
Below: Step-by-step assembly of this panel system for an 8′ by 12′ structure. Notice the pockets in the wall panel edges and the bottom and yellow top plates. This and screws and/or nails is what holds the building together.


The only difference between the illustrations above and below is that the top plate 2x4s have been inserted into the pocket at the top of the wall panels.


If you have any comments, questions, or suggestions I’m all ears. Please post a comment below.
I also want to thank everyone that has contributed comments and suggestions already. It’s amazing to be able to bounce ideas off you all. THANKS!


I was thinking about your project while driving the other day – thinking you probably want to make your panels more like a module. your corner modules should not need to be ‘handed’ meaning that the left corner just needs to be turned over to be the right corner. same thing with the windows, they should be centered on the panel both vert and horiz so that if you have them in a corner you don’t need to have 2 separate versions. I am also worried about the potential weight of these panels and the possibility of taking on water/moisture. there will probably be extended periods where these panels are exposed to the elements when they are stored. As well, in most areas, infestation of wood is very common. While, wood stud construction in the US is conventional for residential construction, it is not ideal in most other places. In your application, you probably want to consider using metal studs – they are lighter and thus more transportable and that way they won’t turn into mobile termite villages.
I’m not sure I get what the goal of this is… Cloth shelters (whether it be a tent, a tepee, a yurt, or something of a more modern form) are lighter, cheaper, more transportable for true emergencies and the homeless. And if you’re looking for something more permanent, building with locally available materials (whether it be bamboo, timber, or earth) in the developing world is a far better idea. And in the developed world, we have panelization systems already, most notably SIPs.
Who do you see using this system?
SIPs are manufactured, custom made, and a bit more expensive, although would be more desirable if available. These 2×4 and plywood panels (manufactured but common) can be made from common building materials available here in the US and South Africa (so I’ve been told by the fellow who asked for that 16×16 design). A 4×8 panel can also be transported fairly easily, assembled and dsassembled. So 2x4s and plywood seem like the right material for this particular solution.
While I hope this gets used for humanitarian solutions I suspect it will be used by people looking for a backyard tiny house so it would work for them too… easy DIY project with common materials and tools.
Cloth isn’t exactly 4 season although I’ve seen it advertised that way. I wouldn’t discourage anyone from going with cloth but I would argue that winterizing might be a concern.
Natural materials in the developing world are the best thing to use, IMHO… in fact dirt (adobe, earthbag, rammed earth, cob, etc) are probably the best building material to use in most parts of the world, but it’s not transportable nor easy to build with.
So… if you want a 4-season building and 2x4s and plywood are the most abundant building material it seems only logical to use that. Does that make more sense? Here are the very first posts explaining the origins of this latest flurry of designs:
http://www.tinyhouseliving.com/2009/09/09/philanthropic/a-house-for-khayelitsha/
and
https://tinyhousedesign.com/2009/09/04/immediate-action-needed-to-help-the-homeless/
Brillo, remember that there is always more than one solution to any problem. Innovation comes from people looking for “different” ways to do something. My personal interest in this type of construction is not tied to humanitarianism or “green” anything. I’m interested in this system for a lot of reasons, not all of them practical.
I love the idea of a home I could build in my spare time and assemble in place once I find a site. I could argue that Rocio Romero already has prefab kits that fit my tastes, etc., so don’t bother – but it goes a bit further than just wanting to buy something of the shelf. The creativity, problem solving, aesthetics – these are some of the things important to me about this kind of design.
In the end for me, it may be a grand thought experiment and nothing else. We’ll see where it goes.
I am architect in Chile and want to know if I can find this project located in some place. Please, if they have photos to send to me mail.
Nobody has told me they’ve built one yet. I will post photos online eventually. https://tinyhousedesign.com/ebook/tiny-prefab-ebook/
If we’re going to go newtech, then the houses should have a 30 degree roof slope all one way. Face the sloped rooftop south, cover with solar panels, and put northern facing skylights for roomier but energy independent living at very little extra cost.
Such houses ought to last, at a minimum, 10-15 years. When compared with current housing subsidy programs, communities of such homes would likely have a payback of under 5 years. They would also scale modularly for family size, and freestanding units would more easily be replaced in the event of unpleasantness than refurbishing entire multi-dwelling units.
Good stuff!